
How to force my WordPress site to use HTTPS
What on earth is HTTPS and what does it do?
HTTPS, the lock icon in the address bar, means you have an encrypted website connection. While it was once reserved primarily for pages collecting passwords and other sensitive data, the entire web is now leaving HTTP behind and switching to HTTPS.
The “S” in HTTPS stands for “Secure”. It’s the secure version of the standard “hypertext transfer protocol” your web browser uses when communicating with websites. When you send information over an HTTPS connection, no one can eavesdrop on it in transit. HTTPS is the best way for your web browser to verify you are connected to the “real” website and not a clone or imposter site which can gather your sensitive data. So we really want our WordPress sites to use HTTPS.

How do I force HTTPS?
Before you start you will need an SSL certificate. This can be organised via your web host. Many hosts (like my very own ItsmirHosting company) provide free SSL certificates from Let’s Encrypt.
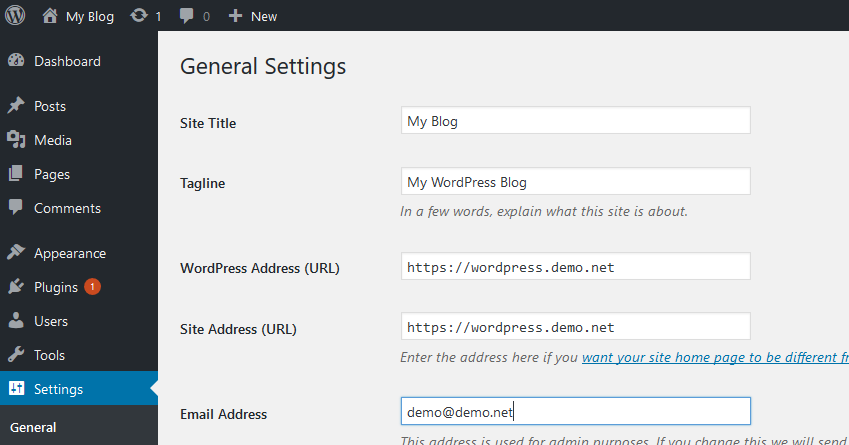
Once your SSL certificate is installed go on over to your WordPress Dashboard and navigate to Settings > General. Here you need to make sure that the WordPress Address (URL) and Site Address (URL) is https. If not, add S after http to make https and save it.
Doing this is usually enough for your site to use the HTTPS protocol. However in some circumstances you may find your website showing an “insecure” warning and the URL has switched to the less secure HTTP. If this happens, don’t panic! We have a couple of tricks to solve this issue.
Option 1 – use a plugin
If you don’t feel comfortable using code or accessing your webroot files then the easiest way to force HTTPS is to use a plugin. I highly recommend the “Really Simple SSL” plugin available from the WordPress repository.
- Head on over to your WordPress dashboard and navigate Plugins > Add New Plugin and search for Really Simple SSL
- Click the Install Now and Activate buttons.
- Click the button labelled Go ahead, activate SSL!
There’s even a video from the plugin devs to guide you through the set-up:
Option 2 – edit your .htaccess file
To force all web traffic to use HTTPS [SSL] insert the following lines of code into the .htaccess file in the root folder of your website. It is important that you insert this above any pre-existing mod_rewrite code – placing it at the top of the file is recommended.
RewriteEngine On
RewriteCond %{HTTPS} off
RewriteRule ^(.*)$ https://%{HTTP_HOST}%{REQUEST_URI} [L,R=301]
As stated above – this will force all web traffic. Perhaps you only want to force a particular domain, well I have another code snippet for that.
RewriteEngine On
RewriteCond %{HTTP_HOST} example\.com$ [NC]
RewriteCond %{HTTPS} off
RewriteRule ^(.*)$ https://example.com/$1 [R=301,L]
Ensure you to replace “example\.com” with your actual domain name. The back slash “\” before the period is important. And don’t forget to replace the “https://example.com/” with your domain name as well.
NOTE:
- If you can’t see your .htaccess file either via your hosting panel or FTP then the file is hidden and you will need to use the “show hidden files” setting.
- Please, please, please make a backup of your .htaccess file before editing it. This wee file is very powerful and getting something wrong here can result in your website being completely inaccessible.
If you need assistance forcing your WordPress site to use HTTPS them please feel free to contact me and I’ll give you a helping hand!


Leave a Reply