Create a (no password) Temporary WordPress Login
Ever thought about setting up a temporary login for your WordPress site? It’s super handy when you want to give someone access for a limited time, like when you’re working with a developer on your website.
In this guide, I will walk you through creating a short-term login for WordPress without the hassle of dealing with passwords.
When would you need a Temporary WordPress Login
Picture this: you’re a WordPress newbie and you’re teaming up with a developer to make some small changes to your site. Those changes might require them to access your admin area. If you’re all good with the developer, you could create a full-on admin account just for them and then delete it once they’re done with their magic. Plus, you can also add new users and authors to your WordPress site, and if needed, give them the boot without completely wiping out their account.
But here’s the kicker. Sometimes, life gets busy and it’s easy to forget that you’ve given someone access. That’s not great for security, right? So, here’s an idea: why not make an account that’s only around for a little while? It’s like an automatic self-destruct for login access, and the best part? No need to remember or share passwords!
So, if that sounds like a plan, let’s jump in and see how you can easily make these short-lived, password-free, temporary logins in WordPress.
The first step is to install and activate the Temporary Login Without Password plugin. It’s free and does all the heavy lifting for you.
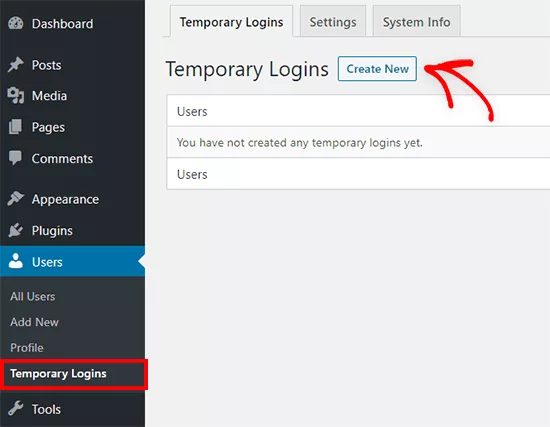
Once you’ve activated the plugin visit the Users » Temporary Logins page and click the ‘Create New’ button to generate a new temporary login account.
You’ll be presented with a form to set up the user. Firstly you will need to input the email address of the user followed by their name.
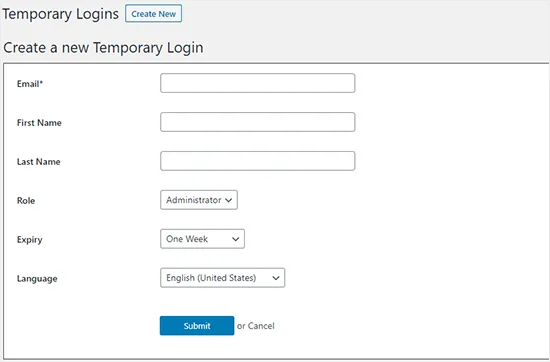
Now, it’s time to pick a user role – choose wisely!
Feeling uncertain about which role to go with? No worries! WordPress.org has you covered with their guide to user roles and permissions.
You’ll also need to decide how long this temporary account should last. Think of it like setting an expiration date – for instance, you might choose ‘one week’ as the duration before the account automatically vanishes.
Lastly, you’ve got the option to select the language preference for the new user. This chosen language will be what they see when they access the WordPress dashboard.
Once you’ve made these choices, hit that ‘Submit’ button. A success message will pop up along with a URL. This URL can be shared with anyone who needs to log into the newly created temporary account.
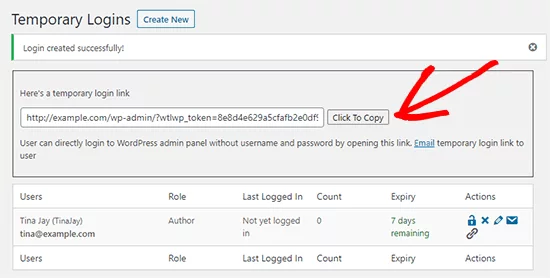
With the plugin in play, managing temporary logins becomes a breeze. Just head over to Users » Temporary Logins, and you’ll find yourself face-to-face with a neat list of all the temporary logins you’ve set up on your site.
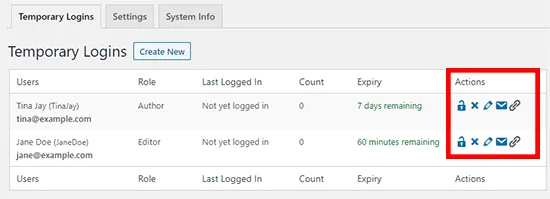
Taking Charge of Temporary Logins
For each account listed, you’ll have access to details like the user’s name and email address. Alongside that, you can easily spot the role they’ve been assigned, their most recent login date, and the countdown until the account says its goodbyes.
Over in the Actions column, you’re in the driver’s seat. You can choose to expire a login before its official expiry, wipe an account off the list, tweak user info, and even dish out emails or duplicate that handy temporary login URL.
Quick note: When a temporary account gets the permanent boot, any content they’ve created – think posts and pages – will now display the administrator’s account name as the author.




Leave a Reply